This is a guest post from Sujit Kumar. If you want to contribute guest posts to code(love), email [email protected].
What is Gatsby?
Gatsby is a static site generator that uses popular technologies such as ReactJS, Javascript and GraphQL in a way that is not dependent on external resources. This makes websites DDOS-resistant, faster, and more secure — and it is really easy to integrate with common content management systems like Drupal.
Why use Gatsby?
- Unlike dynamic sites which render the pages on demand, static site generators pre-generate all the pages of the website.
- No more live database querying and no more running through the template engine each time you load a page.
- Performance goes up and maintenance cost goes down.
- Using Gatsby means you can host the CMS in-house and publish the content generated by Gatsby as a static website.
It’s always good to increase the performance of Angular and React applications. This is one way you can do it.
GatsbyJS covers all the buzzwords out there like ReactJS, GraphQL, WebPack etc, but the coolest part is that you’re up and running in no time!
Since Gatsby is built on React you straight away get all the things we love about React, like composability, one-way binding, reusability and a great environment.
Gatsby makes Drupal work as a backend which means that we can get a modern stack frontend and complete static site with Drupal as a powerful backend.
Set up Drupal
- You have to install and configure the JSON API module for Drupal 8.
- Assuming you already have a Drupal 8 site running, download and install the JSON API module.
- Composer require drupal/JSON API
drupal module: install JSON. Or install it manually on Drupal 8 sites.
- Next, we must ensure that only read permission is granted to anonymous users on the API. To do this, go to the permissions page and check the “Anonymous users” checkbox next to the “Access JSON API resource list” permission. If you skip this step, you’ll get an endless stream of 406 error codes.
After this, you should be all set. Try visiting http://yoursite.com/jsonapi and you should see a list of links.
Install gatsby
Now we need to work on Gatsby. The first thing we need to do is install the Gatsby client. If you don’t have it installed already, run this through NPM to grab it:
npm install --global gatsby-cli
That’ll give you the “Gatsby” cli tool, which you can then use to create a new project, like so:
gatsby new my-gatsbyjs-app
That command basically just clones the default Gatsby starter repository and then installs its dependencies inside it. Note that you can include another parameter on that command which tells Gatsby that you want to use one of the starter repositories, but to keep things simple we’ll stick with the default. Now if we look at the project we can see a few different directories.
ls -la my-gatsbyjs-app/src/
#> /components
#> /layouts
#> /pages
Pages
The pages directory contains the pages. Each file becomes one page and the name is based on the file name. Each of these files contains a react component.
This is the index.js that we just created.
<script src="https://gist.github.com/nehajmani6/d0509a7b7bf0d8c2e7cf2e4634812155.js"></script>
Layouts
The Layout directory contains a layout that wraps our pages. These layouts are higher order react components that allow defining common layouts and how they should wrap the page. We can place our page where ever we want within the layout using the prop children.
Let’s look at a simple layout component
<script src="https://gist.github.com/nehajmani6/2e23c6ce6f152dfe5619c4c17394efaf.js"></script>
As you can see, our layout component takes two props.
One is children prop, where the page is wrapped by us.
The second prop is the data. This is actually the data we fetch with the GraphQl query that is at the end of the code snippet – which in this example fetches the title from the gatsby-config.
Components
The last directory is the components. It is used for creating general components. Fire up the newly generated site.
To run the development mode of the site and to get a Rough idea, run the command:
gatsby develop
#> DONE Compiled successfully
We’re now up and running! See for yourself at http://localhost:8000
Once complete, you have the basis for a working Gatsby site. But that’s not good enough for us! We need to tell Gatsby about Drupal first.
For this part, we’ll be using the gatsby-source-drupal plugin for Gatsby. First, we need to install it:
cd my-gatsbyjs-app
npm install --save gatsby-source-drupal
Once that’s done, we just need to add a tiny bit of configuration for it, so that Gatsby knows the URL of our Drupal site. To do this, edit the gatsby-config.js file and add this little snippet to the “plugins” section:
plugins:
[
  {
    resolve:`gatsby-source-drupal`,
    options: {
      baseUrl: `http://yoursite.com`, //Drupal site url.
 apiBase: `jsonapi`, //This the jsonapi endpoint
    },
  },
]
You’re all set. That’s all the setup that’s needed, and now we’re ready to run Gatsby and have it consume Drupal data.
Run gatsby
Let’s start the development environment to see the Gatsby running.
Run this to get Gatsby running:
gatsby develop
If all goes well, you should see some output with gatsby default starter:
You can now view gatsby-starter-default in the browser.
http://localhost:8000/
View GraphiQL, an in-browser IDE, to explore your site’s data and schema
http://localhost:8000/___graphql
Note that the development build is not optimized.
To create a production build, use gatsby build
(If you see an error message instead, there’s a good chance your Drupal site isn’t set up correctly and is erroring. Try manually running “curl yoursite.com/jsonapi” in that case to see if Drupal is throwing an error when Gatsby tries to query it.)
You can load http://localhost:8000/ but you won’t see anything particularly interesting yet. It’ll just be a default Gatsby starter page. It’s more interesting to visit the GraphQL browser and start querying Drupal data, so let’s do that.
Fetching data from Drupal with graphql
Load up http://localhost:8000/graphql in a browser and you should see a GraphQL UI called GraphiQL (pronounced “graphical”) with cool stuff like auto complete of field names and a schema explorer.
Clear everything that is on the left side and start inserting the open curly bracket and it will auto insert the closing curly bracket. Then click ctrl + space to view the auto-complete, which will list the all possible entity types and bundles that we can query.
It should look something like this:
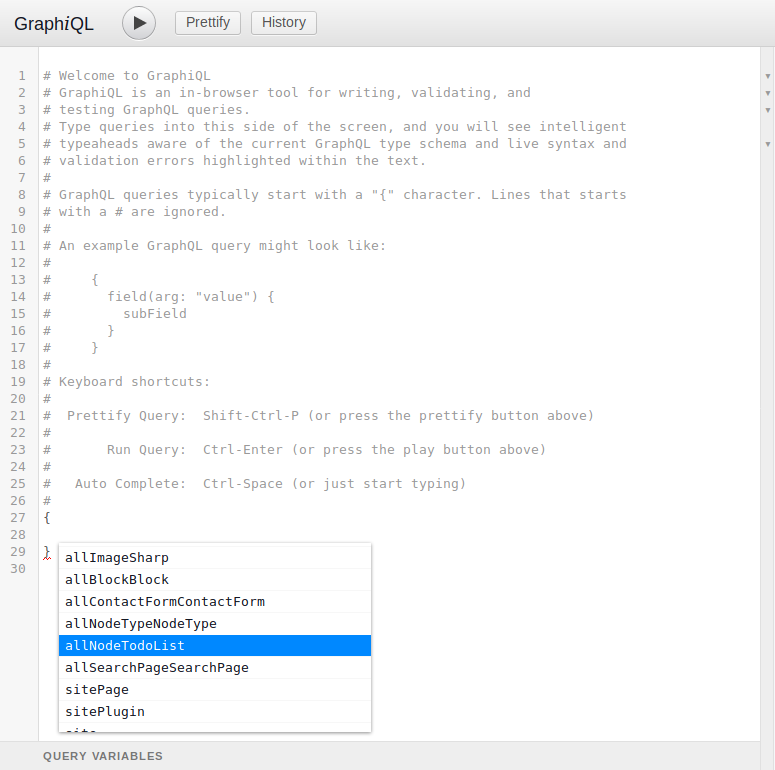
For example, if you want to query Event nodes, you’ll enter “allNodeEvent” there, and drill down into that object.
Here’s an example which grabs the fields (field_task_name, field_date and nid) of the TodoList nodes on your Drupal site:
{
    allNodeTodoList{
        edges{
            node{
                nid
                field_task_name
                field_date
            }
        }
    }
 }
Note that “edges” and “node” are concepts from Relay, the GraphQL library that Gatsby uses under the hood. If you think of your data like a graph of dots with connections between them, then the dots in the graph are called “nodes” and the lines connecting them are called “edges.”
Once you have that snippet written, press “control+Enter” to run it, and you should see a result like this on the right side:
{
  "data": {
    "allNodeTodoList": {
      "edges": [
        {
          "node": {
            "nid": 1,
            "field_task_name": "Learn Drupal",
            "field_date": "2018-12-14"
          }
        },
        {
          "node": {
            "nid": 2,
            "field_task_name": "Complete drupal task",
            "field_date": "2018-12-15"
          }
        },
        {
          "node": {
            "nid": 3,
            "field_task_name": "Learn gatsby",
            "field_date": "2018-12-16"
          }
        },
        {
          "node": {
            "nid": 4,
            "field_task_name": "Gatsby Project",
            "field_date": "2019-01-10"
          }
        }
      ]
    }
  }
}
Note the same code will give the data from Drupal which includes the reference data, URIs etc.
Pretty cool right? Everything you need from Drupal, in one GraphQL query.
So now we have Gatsby and Drupal all setup and we know how to grab data from Drupal, but we haven’t actually changed anything on the Gatsby site yet. Let’s change that.
Displaying drupal data on the Gatsby site
The cool thing about Gatsby is that GraphQL is so baked in that it assumes that you’ll be writing GraphQL queries directly into the pages or the components.
In your codebase, check out src/pages/displaynodes.js.
<script src="https://gist.github.com/sourabhsp21/1f69d5cffc5a4bd220b243a2dd8fb3a5.js"></script>
(Note, this assumes you have a node type named “Page”).
All we’re doing here is grabbing the node (task name and task date) via the GraphQL query at the bottom, and then displaying them in a table format.
Here’s how that looks on the frontend:
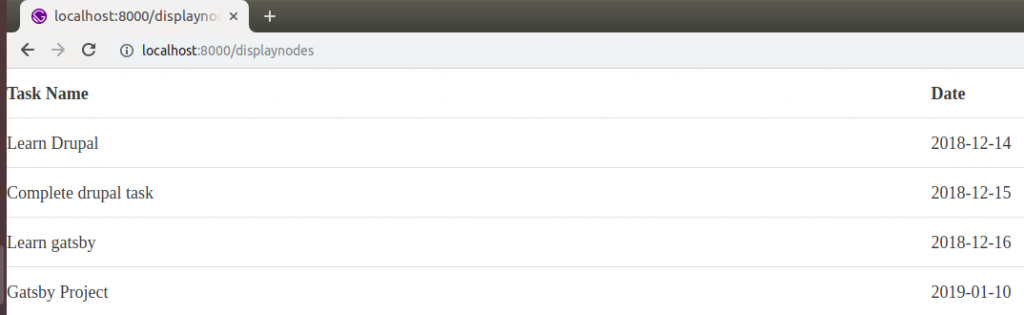
And that’s it! We are displaying Drupal data on our Gatsby site!
Author Bio:
Sujit Kumar is VP of Strategy & Marketing at Valuebound taking care of all aspects of lead generation, company and brand promotion and sales activity. He brings nearly 14+ years of marketing experience, strategic thinking, creativity, and operational effectiveness. Prior to joining Valuebound, Sujit worked in marketing management positions with professional services firms.


